A quick and dirty guide to designing and making stencils
These are notes to accompany my workshop at Hacking in Parallel 2022. However, they should be useful on their own. Enjoy!
What is a stencil? #
It's a mask with a graphic cut out of it. We put the stencil on top of something, apply paint to the top of the stencil, remove the stencil, and the graphic stays. Also - a fun and easy way to decorate literally anything.
Why stencils #
You want to cover something with paint, and you're overwhelmed with the multitude of options available for doing that. Indeed, people have invented many ways of splotching paint onto things, from hand paintings in caves to inkjet printers with height-adjustable heads that can automatically splotch an astounding array of materials on almost any shape. Stencils are a good place to start. They are almost never the right way to apply paint, but few other printing techniques are so versatile, quick, cheap, and easy to make. With the advent of digital fabrication, making them got even easier, cheaper, and quicker. If you have access to a laser or vinyl cutter, you can make great stencils without any manual or art skills. This is why I find them so appealing.
This guide #
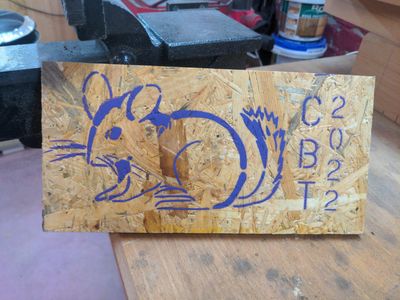
In this article, I'll guide you through the process of making stencils from start to finish. We'll make a stencil of this guy:

I like hiking, and after every long hike me and my hiking buddy decorate our sleeping bag with a relevant graphic. This year, we were in the Andes, and we saw lots of chinchillas, so here you go.
We'll be exploring a purely digital workflow, using Inkscape, and GIMP - libre graphics editors. I will not teach you how to use them, or how to program a cutting machine. There are many resources for this on the internet. Popular non-libre equivalents are Adobe Illustrator and Photoshop.
File prep #
Vectorise #
It all starts with a file. Ideally, you start with a vector file. I'll be using Inkscape, which is a libre vector graphics editor. If you don't know what the difference between vector and raster is, check out this article. Here're we're starting with a raster graphic, so we need to vectorise it. In Inkscape, this is done with Path->Trace Bitmap.
A simple, black and white image like this is easy to vectorise. Full color photos are much more difficult to work with, you may need to experiment with settings a lot.
Islands and Bridges #
Graphics #
Below is our newly minted vector graphic. The line is where our cutter will cut. Look at the left ear of our chinchilla, and the bit around the whiskers. Once we cut those lines, the inside will fall out. When we paint it, we'll have a lot of paint where we wanted none. This is called an island.
To solve the problem of islands, we add bridges which support them. Bridges are what gives art the stencil look.
You can add bridges by editing your vector file directly, but I prefer to convert it into a bitmap and paint them on by hand in GIMP. This results in more organic shapes.
Making bridges is the only part of this process that is not foolproof. It takes some experience to see how long a line and how thin a bridge you can get away with. It all depends on your stencil material, and what you want to paint on. My recommendation is to be conservative, and think of dividing the artwork into many thin lines. Try to create bridges at the intersection of lines, not in the middle of a single line, to make them less jarring. If you do it right, your bridges aren't noticeable; they become part of the style of your piece.
If anyone would like to collaborate on a program to do this automatically, hit me up.


Text #
If all you want is text, bridges are much easier - you can get dedicated fonts for stencilling. Many of them come with open licenses. Just search for free stencil font, and you will be spoilt for choice. I like Post No Bills Colombo for a light sans font, Stencilia for a heavy sans, and Botera Regular Stencil for serifs. Just don't forget to convert your text to path before sending it to a laser/vinyl cutter!
Making it #
Machines #
If you don't want to cut your stencils by hand, you have two options for machines that will do it for you - a laser or a vinyl cutter. A laser cutter is easier to use - you drop your material in, pick the right setting, and press go. However, it will not produce a great edge. A vinyl cutter requires more effort in setup and post-processing, but it can deal with a wider range of materials, and it cuts a really nice edge. It's also an order of magnitude cheaper to buy and operate (hundreds vs. thousands of euros).
I have access to five different laser cutters at the moment, and I still use a vinyl cutter for most of my stencils. Largely out of habit, but also because it's a cleaner, more satisfying process.
In the end, it's up to you, either will work just fine.
| Laser | Vinyl | |
|---|---|---|
| Time to learn | 10min | 1h |
| Setup | very easy | slightly less easy |
| Post processing | none | requires weeding (>10min for a complex stencil) |
| Price | 4000 - 10,000 EUR for a 600x300mm machine | 300 - 2000 EUR for a 1800mm x infinity machine, easier to buy used |
| Edge quality | lower, often charred, difficult to cut thin bridges | high, clear & crisp |
| Materials | stiff and flexible sheet, but only laser-cuttable materials | anything, so long as it's thin |
Materials #
So now that we have our file ready, and we've chosen our machine, we need a material to make the stencil out of. If you look for stencil material from a crafts store, you'll be offered two plastics. The first one, 100µm Mylar (PET) sheet, is really good for multi-use, flexible stencils.
The other, sometimes branded as Oramask, is very thin PVC foil. It's used for a slightly different stencilling technique than I'm describing here. Oramask is single use, and it's covered with an adhesive, so it sticks down well to your surface. You don't need to use bridges when stencilling with it, you just vinyl cut it, and use transfer paper to stick the pattern to the surface you want to paint.
Here I'm mostly talking about multiple-use, rugged stencils, so I won't mention it again. Below are some other common options.
tl;dr
For multiple-use stencils, use MDF if you want something rigid, or Mylar (e.g. the reverse of a heat transfer vinyl sheet), if you want more precision and ease of transport. For single use stencils, use sticky vinyl.
Cardboard/paper #
Easily cuts on a laser cutter. Cheap, very easy to find in large rolls. Paper will last a few paint applications, cardboard a few dozen.
MDF #
Also nicely cuts on a laser. I recommend 3mm thickness for human-sized stencils. Not great for detailed work, but lasts forever, and is pretty flat, which makes it easy to get good results quickly. Can't be folded, and is pretty heavy, so not great if you want to make large pieces.
Plywood, acrylic etc. #
Other materials that nicely cut on a laser. None of them are as good as MDF for stencils. Thin plywood is rarely flat. Acrylic is brittle and shatters easily. Just use MDF.
Mylar (bo-PET) #
This is what I usually use, as mentioned above. It cuts very nicely on a laser. If you use a vinyl cutter, you need to be aware that most Mylar sheets for stencils will come without a backing. You need to add your own backing (transfer paper works OK for this), or use a sticky cutting mat. OR, you can just use the reverse side of heat transfer vinyl (HTV).
HTV is normally used for making decals for putting on T-shirts. You cut it on a vinyl, and then apply with a heat press. However, the backing on HTV sheets is 100 µm Mylar! So you can turn it around, and cut in the PET with vinyl as backing. I do that a lot.
PVC (vinyl) #

Should not be laser-cut, it'll generate poisonous chlorine and mess up your lens. Obviously it cuts very nicely on a vinyl cutter. However, it's more flexible than Mylar, which makes it difficult to work with, especially for large stencils.
Paints #
There are two main ways of applying paint to a stencil - spraying, or painting. There are a billion different types of paint, I will mention some that are interesting.
Painting #
It's easier to get good results with a roller or a brush than with spraypaint. With rollers, can use water-based paints, which are less toxic, and easier to work with. On most substrates, you can use regular acrylic craft paint. Of course there are dedicated paints for walls, wood etc., which may make sense in your application.
One interesting type of paint usually applied with a roller is fabric paint. You let it dry, and then use a clothes iron to melt it into the fabric, which creates a pattern that will last many washings.
Spray paint #
Quick and dirty, this is what we usually associate with stencilling. Technique is very important here, and it takes some practice. Hold your can 10-20cm away from the stencil, and spray with a steady, even motion.
If you don't rate your art enough to make it permanent, use chalk spray. Outside, in the rain and wind, it will only last for a few weeks. It can be scrubbed off with a little elbow grease.
Alternatives #
As I said at the start, stencils are quick, dirty, and versatile, but they're never the right technique to use. Sometimes it's useful to consider other options.
Screen printing #
If you have a day or two, and you're printing on a flat surface, consider making or ordering a silkscreen. A silkscreen is a mesh stretched on a frame with a pattern printed on it. You lay it flat above your substrate, and squeeze paint through the mesh with a squeegee. This technique can be super accurate (down to 6pt fonts), and high throughput.
A set of equipment for making silkscreens will set you back a few hundred euros, but you can ask someone to make a silkscreen for you for a few tens. Most cities will have a cool screen printing workshop, where you can learn how to make frames, often for free. In Berlin there are Vetomat, SDW, and designjosef.
For a great introduction to screen printing, see this youtube video.

Digital printing #
If you need a large paper print, consider visiting your local printing store. An A0 poster will usually cost around 10 EUR, and many places will print next-day.
Conclusion #
A well-made stencil can be quite pretty by itself, and, with a little practice, they are a joy to make. I hope this guide was helpful, have fun!

Oh, one last thing. Here's our chinchilla stencilled on a sleeping bag. I used a sponge stencil brush, and glittery fabric paint.
